I love to sew clothing that are nursing friendly now that our baby girl is born. Or even hack patterns so that they become nursing friendly. Today I am showing you how to hack the Nivalis dress for Women by Sofilantjes* to make it nursing friendly. I also wrote the tutorial in Dutch so see below for the Dutch description.

In addition to the nursing hack I also hemmed the sleeves differently. I liked the inside of the fabric and therefore just put the wrong sides of the fabric together and sewed it together with a very small zig zag stitch.


So now on to the nursing hack. Hope you like it, if anything is unclear let me know!
What you need:
- Nivalis dress for Women by Sofilantjes (the pattern describes the amount of fabric and notions that are needed)
- invisible zipper (length of the arch for your size in the pattern + a couple of extra cm)
- an extra invisible zipper head (you can buy them separately or cut one off from an existing invisible zipper)
- interfacing
English Tutorial
1) Cut the pattern pieces for option B for the Nivalis dress for Women.
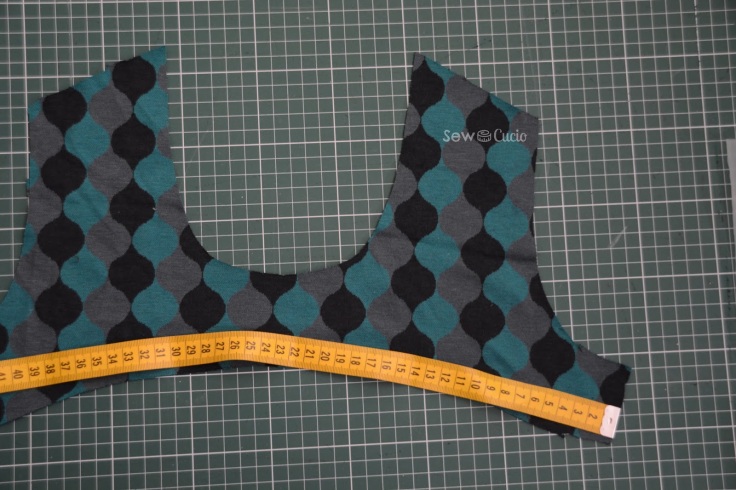
2) Measure the length of the arch in your size. I recommend adding a couple of extra cm for the length of your invisible zipper.
3) Cut two pieces of interfacing of 1,5 cm high and of the length of the arch for your size (for both the top and bottom part where you are going to add your zipper).
4) Iron the interfacing on the front top and bottom pattern pieces on the wrong side of the fabric.

5) Cut off the stops of your invisible zipper by cutting off the teeth diagonally and leave the rest of the fabric of the zipper intact as the photo shows. This will make it easier to put the zipper heads back on.


6) Pull the zipper head off your zipper. This may sound scary (will I ever get that thing on again…?!). Trust me it will be ok.
7) Sew the zipper on the top front pattern piece. You do this by first pinning the zipper with the right side on to the right side of the fabric. The teeth of the zipper are pointing towards your fabric. Then with an invisible zipper foot (or a regular zipper foot) sew the zipper onto the fabric.

8) Do the same for the bottom front pattern piece (sew the zipper to the bottom front piece).

9) Now it is time to put the zipper heads on. Put the zippers with the wrong sides on top of each other with the teeth aligned. Hold it like this and try to slide the head upside down on to the zipper with the widest part towards the fabric as shown in the picture. The part of the zipper where you cut the stop off should slide into the zipper.


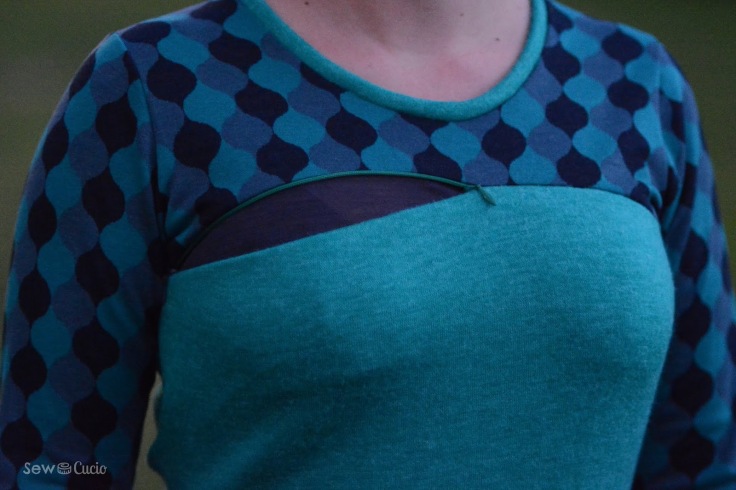
11) Yay! You are done with the zipper! Below is how your front part should look like. Be careful not to slide the zippers off when you are admiring your work by sliding the zippers back and forth 😉. Only when you sew the front to the back of the dress the zippers are safe to stay on the zipper.


12) Follow the instructions in your Nivalis dress pattern to sew the tunic or dress together. I love to see your creations in the Sofilantjes Facebook group.
Fabric: the top part of the dress is a knitted type of fabric which I bought at Caresstoffen. The rest of the dress is wool which I bought at Hoofs.
Pattern: Nivalis tunic and dress for Women by Sofilantjes
Fabric in 2018: this week in 0 – 2 out (2018: bought 36 – used 71 fabric – used 3 gifted fabric – used 16 scrap pieces of fabric) – in total 36 in 90 out
——————————————————————————————————–
Nederlandse uitleg (als er iets onduidelijk is laat het me weten!):
Benodigdheden:
- Nivalis tuniek/ jurk voor vrouwen van Sofilantjes* (in het patroon staan alle benodigdheden qua stof etc)
- onzichtbare rits (lengte: meet de boog van jouw maat in het patroon en voeg hier enkele centimeters bij)
- extra onzichtbare ritsrunner (je kunt deze soms los kopen of je kunt deze van een onzichtbare rits afknippen)
- interfacing
3) Knip twee stroken interfacing van 1,5 cm hoog en met de lengte van de boog.
4) Strijk de interfacing onderaan het bovenste patroondeel en aan de bovenkant van het onderste patroondeel waar de rits straks komt.
10) Doe hetzelfde met de tweede ritsrunner aan de andere kant van de blinde rits. Ook hier geldt dat de ritsrunner erop wordt gezet met het breedste deel richting de stof. The ritsen zitten dus gespiegeld op de rits.
11) Yeej! Je bent klaar met de rits. Hieronder zie je hoe het eruit zou moeten zien. Let op dat je in je enthousiasme om te kijken of de rits werkt de rits er niet vanaf rits, er zit tenslotte geen stop meer op 😉. Pas als je de zijkanten van de jurk vastnaait door deze aan de achterkant vast te naaien kunnen de ritsen er niet meer vanaf geritst worden.
12) Volg verder de stappen in de instructies in het patroon om de jurk verder in elkaar te zetten. Ik ben benieuwd naar jullie creaties en zie ze graag verschijnen in de Sofilantjes Facebook groep!
* Some of the links in the post above are “affiliate links.” This means if you click on the link and purchase an item, I will receive an affiliate commission, the price for you will be the same. Thank you for supporting my fabric and pattern addiction!


Goed gevonden! En mooie kleurtjes
LikeLike
Dank je!
LikeLike
Klaar voor productie zou ik zeggen !👍🏻
LikeLike
Absoluut!
LikeLike
Wat een mooie oplossing en wat een mooie stoffencombi heb je gebruikt.
LikeLike
Dank je wel!
LikeLike